I love doing my nails and a lot of women don’t have the time to do it but I make the time to do it. It is a very interesting art form and as i have seen a lot can be done. So after you-tube videos, tutorials and step by step research. I can now pass what i have learnt onto my blog, as I found that if I didn’t want to watch a video there was barely any tutorials that I did find, or step by step how to’s. So i decided to try make my own. I practice on a friend who loves having her nails very different from the norm of a french manicure in pink or pearl! I hope to post a lot more of these, I hope for those that want to find a strep by step that this 1 and more may come in handy.
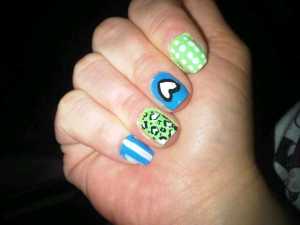
Lime and Blue Nails with patterns!
You’ll need :
2 Base Colors
White & Black Nail polish pens, (alternatively you can use Black and White nail polish, for outlines you can use the wooden nail stick or anything you find that helps you to draw pattern.)
Top Coat
How to :
1. Firstly you pick 2 base colors, mine were Lime Green and Blue.. you can even paint them just 1 color if you like..
2. You paint your nails in any pattern. Let the polish dry first.
3. Index Finger: I made dots, if you’re using a nail stick make sure your nail polish has been shaken and isn’t thick. Then pour a little onto a plastic plate, dip your stick into it and gently start to dot on the nail. (If you have nail polish pens then dot with the white pen)
4. Middle Finger : I drew a heart, i did the out line first, you do this by using the same procedure as in step 3, except your then going to first clean your stick, pour a little black nail polish onto your plate and then dip into it and start to gently draw a heart on the desired area of the nail. (With nail polish pens, using the black pen draw the heart outline and fill it in with the white pen.)
5. Ring Finger : I drew cheetah spots. So, pouring a little more white paint onto your plastic plate, and having already cleaned your stick, dip it once again into the white polish and make dots on the nail. You can also use the nail polish brush instead, to get dots that are a little round shaped. Once the dots have dried, Take you stick, dip it into the black polish and make outlines around the spots. (With nail polish pens, using the white pen dot spots on the nail, when dry with the black pen, draw the outlines)
6. Baby Finger : I did white stripes : take your brush, dip it into the white nail polish, gently start to make stripes. This is a little harder and take practice, as the lines don’t always come out perfect! (With nail polish pens, using the white pen, start from the cuticle end of the nail and draw stripes as desired)
7. The Thumb, I left plain. But you could do any pattern you like!!
8.Once the nails are dry, use a Top Coat so the patterns don’t chip off! Be careful when applying the Top Coat not to smudge your new nails…
And that’s how I did these nails. For ease it pays to buy nail pens to be able to draw onto the nail. Which I use.
I hope this helps those that want to learn just like me!!

